This blog is the place where I will talk about my new paintings, works in progress, why I created particular pieces, and other trivia that I will put down, if for no better reason than for posterity's sake. I hope some of it is interesting and that you will make comments to serve as a compass to guide me for future posts.
Memorial Cards for Your Recently Departed Loved One
Whether for a funeral, a memorial service, or to share with loved ones and friends, these timeless prayer cards offer a meaningful way to honor a cherished life. Each card features one of my original paintings on the front, paired with a heartfelt prayer at the bottom. If preferred, your loved one’s photo can replace the artwork to create an even more personal tribute.
The back of the card includes a thoughtful condolence message and can be personalized with your dearly departed’s name, dates, and any additional details you wish to include. Customize as desired to create a keepsake that beautifully reflects their memory.
These featured cards represent only a handful of the 200-plus designs available in the full collection. Click the link below each card for more details about that card.

Elegant Celebration of Life Memorial Service Card

Beautiful Irish Blessing Purple Green Business Card

Memorial Funeral Irish Blessing Prayer Card

St. Francis of Assisi Sympathy Prayer Card

Serenity Prayer Memorial Funeral Card


Beautiful Impressionistic Cone Flowers Prayer Card

In Loving Memory Picture Sympathy Card

A Symphony of Autumn Aspens Step by Step - Available


For prints of this painting and other custom products visit my online Zazzle Store.
Sign up for my Email Newsletter.

Step-by-Step Painting Process for White Sails - Available

Step 1

Step 2

Step 3

Step 4

Step 5

Finished Painting
Acadia Hike Steps - SOLD

Photo Reference

step 1

step 2

step 3

step 4

step 5

Finished Painting - SOLD
For prints of this painting and other custom products like coffee mugs and mouse pads visit my online Zazzle Store.
Sign up for my Email Newsletter.

step-by-step painting process for Kenosha to Breckenridge Trail, #1 in my aspen series — SOLD


step-by-step painting process for Aspen Delight, #5 in my aspen series, — SOLD


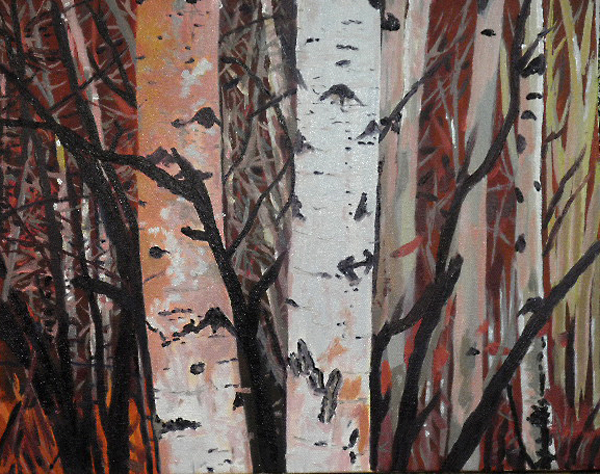
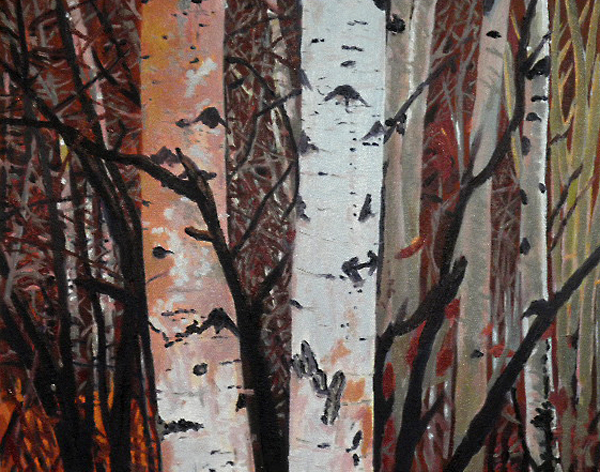
I worked on the background, adjusting color in places and painting over some branches that were too fat. I then carefully painted some of the branches back in keeping them thin. I next worked on the tree trunks on the right side, defining shapes, color, and highlights. Before I finished for the day I added a little reddish brown color in places on the dark foreground branches to give them a little form.

I added some dark shades to the top of the knots and some reddish color below them. Next I added more branches, both light and dark between the major trunks and to their right. This has the effect of pushing the smaller trunks back.
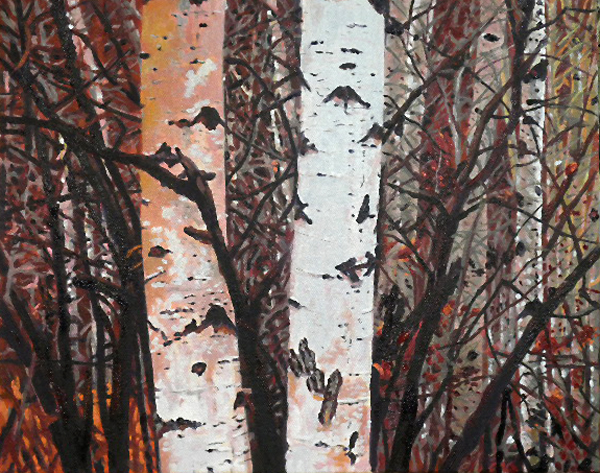

Finished Painting, Aspen Delight, 16" x 20" Oil on Canvas - SOLD
I spent most of the time today working on the large tree trunks adjusting color and adding highlights. I added a couple of highlights in the background and signed the painting.
Color, contrast, and cropping are close to the original but not exact.
For prints of this painting and other custom products like coffee mugs and mouse pads visit my online Zazzle Store.
Sign up for my Email Newsletter.

Why do artist's paint self-portraits? My opinion.
So why do artist's paint self-portraits? I've only done two of them; one in 2009 and one this week, so I'm not claiming to be an authority on this subject. However my observations tell me that they do it for a number of reasons. One reason is to get better at portrait painting and painting in general, especially if painting from life rather than a photo.
Another reason for painting a self-portrait is to sell them. I know it seems odd at first to think someone would buy your self-portrait but people do. Some artists paint a new self-portrait every year perhaps to document their years spent as an artist. It is also fun to compare them year to year as a means of measuring one's progress. I am planning to paint one each year starting now. And what better memory could there be than a painting of one's parent as a memory.
Painting a portrait, for me, is also one of the most difficult subjects to paint, as is painting the figure as many of us do regularly or occasionally. It is interesting to see how the facial planes seem to turn and appear to recede by using a cooler color at the point of intersection. Unless you have studied anatomy, you would probably not realize how many planes there are in the face. Without that knowledge it is harder to paint a nose, a mouth or an eye. But that all part of the challenge and for some reason, I am not sure why, I am drawn to painting the human face, even if it is my own. I just haven't been doing it as much as I want to now.
I don't want to turn this post into a book so now I will tell you a little about this painting. I painted this self-portrait using a mirror rather than a photo reference. It is harder to do this way but the results are usually better than with a photograph. I bought a good size mirror last year for this very reason. As I mentioned above the last self-portrait painting I did was in 2009. Boy has my style changed and I hope you will think for the better. Hope you all like it.
Color, contrast, and cropping are close to the original but not exact.
Sign up for my Email Newsletter.
Visit my Zazzle Store for a huge variety of items imprinted with my images. Please let me know if there is something you want but don't see. I may be able to create it for you. Thanks.

Blossoms of White Steps - SOLD
The following are the stages of this painting. Photograph provided by Phil Starke and used with his permission.

Original Photo by Phil Starke.

This was the beginning of the block on the first day. I used mostly cool colors in the background to create a sense of depth.

In this photo the painting was pretty much blocked in and some detail was added.

Now the painting is completely blocked in and I added more detail.

Finished Painting - SOLD
For prints of this painting and other custom products like coffee mugs and mouse pads visit my online Zazzle Store.

Why Artists do Plein Air Painting? My Opinion.
There are plenty of challenges when painting out of doors. Things like: insects - including but not limited to mosquitoes and ticks; snakes; curious animals; intense heat and cold; rain and snow; wind; dust; traffic; noise; people who don't like that you are painting in front of their property; people who will honk at or yell at you when they drive by, etc. As a result many artists never leave the comfort of their studios.
I love being outdoors and seeing the beauty of nature that God has given us. I like the idea of capturing a moment in time, the freshness of painting quickly, seeing the true colors of light and shadow, and giving my personal response to a scene.
Whenever I am out painting on location, or "en plein aire" as the French liked to call it, I am often approached by curious passers' by. Some have never seen an artist painting out of doors or at least have never been up close to one. Some people will stand back and watch in silence. Others will ask if I would mind if they take a look. Still others will come up and take a photo of my painting without even asking if is okay to do so. I prefer the more mannerly ones who ask permission.
For some reason a lot of people feel like they have to say things like: I can't draw a straight line or I can't even draw is a stick figure or my aunt is a REALLY GOOD painter or how long does it take you to do a painting like this? or do you sell your work? or what are you doing? and many more comments and questions.
I always try to be nice to people and patient when they ask questions, sometimes selling the painting right off of my easel. There are artists who hate it when they are approached and feel like it is an intrusion to their privacy. They can be curt or not respond if someone asks them a question. A few will where T-Shirts with answers to common questions printed on them, to discourage comments.
Plein Air painting is my favorite way to paint.
Color, contrast, and cropping are close to the original but not exact.
Sign up for my Email Newsletter.
Visit my Zazzle Store for a huge variety of items imprinted with my images. Please let me know if there is something you want but don't see. I may be able to create it for you. Thanks.

step-by-step painting process for Upper Trail, #4 in my aspen series — SOLD
This is the forth painting in my Aspen Series of Paintings. I hope you enjoy seeing the progress of the paintings as I create them. I suggest following my blog to get all the latest updates.

Step 1
Original Reference Photo Provided by Tim Fishback
My first step was to select a subject for this painting. I didn't have any photos that were screaming at me to paint them so in this case the selection process amounted to finding a painting within a photo. I began to look at the photos more closely and I saw a lot in this one that I liked such as the path, the light on the path, the back lighting, and the leaves in the top right that were lit up by the sun.
I started by editing the photo in Photoshop. I will usually adjust the levels, increase the contrast and hue slightly, and use a little bit of the unsharp mask filter. Next I decided to chop off or crop a bit off of the left side leaving what I felt was the most important and most interesting part of the photo. This is what I will paint.

Step 2
The next step was deciding what size canvas to use. I want it to be large so I decided on a height of 60 inches. By measuring my photo and dividing the height into the width I was able to determine the ratio of height to width. Multiplying the height by the ratio gave me my width of 33 inches. So I ordered a custom canvas of 60" x 33". The first thing I did upon receiving the canvas was paint the sides with black acrylic paint. It can be done after the painting is finished by I prefer doing it in the beginning so that I don't get any of that paint on the painting surface.

Step 3
With this painting I decided I would spend more time creating a highly detailed sketch. I worked on it 3 different days from a couple of hours to 5 or 6 hours each day. I then sprayed it with Krylon Low Odor Clear Finish to prevent smearing from the sketch pencil I used. By working out more complicated areas in the sketching process I hope to save time in the painting process. We'll see how that works out.

Step 4
Before I started painting I mixed up puddles of paint for the major colors I would be using and put a swipe of each on a piece of mat board. I labeled each of the swipes and listed the colors I used to mix them. Now I can refer back to this chart whenever I need to throughout the painting process. I started painting by using my sky color, a mixture of titanium white with a little bit of cad yellow light and alizerin crimson, and painting between the trunks adding a little ultramarine blue to the mix near the top and on the right side. Next I used some of my light green puddle to indicate foliage between the trunks, adding more yellow in places as I moved up the canvas. Then I used a very dark color to block in some shadows, adding in some of the larger patches and branches on the trunks. The last thing I did before going to bed after midnight was to block in some very dark green where later I will paint in some of the closer and darker leaves.

Step 5
I added some leaves in the lower left side of the canvas and worked on the dark leaf mass in the upper right. In that area I darkened the branches and added highlights to some of them. I darkened some of the smaller branches going through the leaf mass and added more smaller branches. I then added some highlights to some of the trunks around the canvas.

Step 6
Today I worked in the bottom left side of the canvas, refining the path and the foliage around it. I am just about finished from the bottom left to the center of the canvas and I am working toward the right until I reach the other side. I will be coming back and making some tweaks before I call it finished.
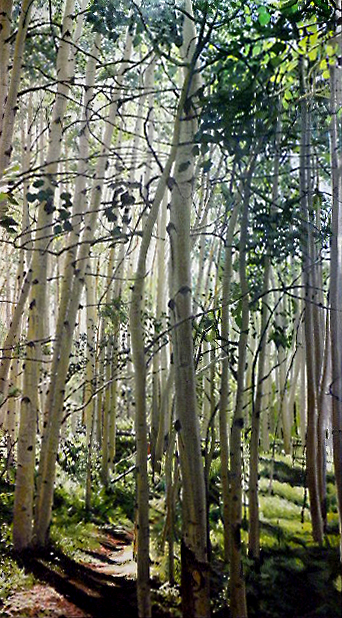
Step 7
Today I worked on the foliage in the bottom center of the canvas, moving from left to right. I adjusted some of the smaller tree trunks to better define them and the areas around them. I also defined the path further into the painting which, due to perspective, is getting smaller. I also changed my camera setting to an indoor setting which made the colors in this photo look much more like the actual painting than the previous shots.

Step 8
Today I continued to work on the ground foliage, starting on the bottom right and moving up. I added a couple of small trees and branches. This painting is very close to being finished.

Finished Painting - SOLD
I started by adding more warmth in the brightest foliage areas to create more color harmony. Next I worked to define the shape and color of some small background trees on the right side. I then added some of the black spots on the trees in both the close and background trees. I also added more highlights on the background tree trunks and I added some additional branches to some of the background trees. To finish I added more branches, highlights, and variation in the bark color to create texture. This photograph isn't the final one. It was taken in my studio. I will be taking the painting in to get it professionally photographed.
For prints of this painting and other custom products like coffee mugs and mouse pads visit my online Zazzle Store.
